
Rakenduse leiutaja: looge Androidi rakendus - õpetus
Selles praktilises näpunäites selgitame, kuidas Androidi rakendusi App Inventoriga luua. Rakenduste ehitamiseks suhteliselt lühikese aja jooksul järgige seda õpetust.
Logige sisse MIT App Inventorisse
Minge App Inventori veebisaidile ja klõpsake paremas ülanurgas nuppu "Loo".
- Rakenduse leiutaja nõuab teie Google'i kontole juurdepääsuks luba. Kinnitage klõpsates nuppu "Luba".
- Pärast esimest sisselogimist saate osaleda küsitluses. Kui te seda ei soovi, klõpsake nuppu "Ära kunagi tee küsitlust".
- Seejärel klõpsake App Inventori tööruumis nuppu „Jätka”.

Looge rakendus App Inventor esimene rakendus - paigutus
- Klõpsake vasakus ülanurgas nuppu "Uus projekt". Sisestage projekti nimi ja valige "Ok".
- Nüüd lohistage vasakul olevast kasutajaliidesest silt "Label" keskel kuvatavale ekraanile. Jaotises "Atribuudid" saate muuta äsja lisatud sildi teksti "Tekst".
- Salvestage projekt "Projekti" kaudu ja valige "Salvesta projekt".
- Nüüd saate libistada ekraanil kõik muud kasutajaliidese elemendid. Muu meediasisu saab lisada ka jaotise "Joonistamine ja animatsioon" kaudu.
- Elementide paigutuse muutmiseks kasutage nuppu "Paigutus".
Loogika üle plokkide - näide
Kui soovite oma rakendusele luua täiendavaid ekraane, klõpsake "Lisa ekraan". Seejärel võite näiteks minna oma paigutuse teisele ekraanile, kasutades elementi "Button". Selleks on aga vaja taustal töötavat loogikat. Rakenduse leiutajas saate need luua blokkide abil.
- Selleks klõpsake paremas ülanurgas valiku "Kujundaja" kõrval oleval valikul "Plokid". Seal lähete vastavale ekraanile ja klõpsate vasakpoolsel ekraanil oleval nupul Blocks.
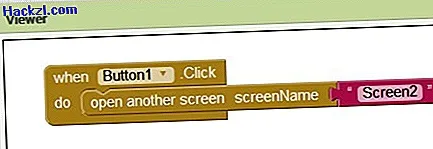
- Valige funktsioon "Button1.Click do".
- Nüüd sisestage sellesse elementi "Mõistatus" element "Juhtimine", nimelt "Avage veel üks ekraaninimi".
- Nüüd puudub ainult ekraaninimi. Selleks klõpsake blokkide kuval nuppu "Tekst" ja valige ülemine element, mis koosneb ainult kahest jutumärkist.
- Sisestage sellesse elementi, selle näite "Screen2" jaoks ekraani nimi.
Testige rakendust oma nutitelefonis
Kui soovite testida App Inventoris loodud rakendusi otse oma Androidi nutitelefonis, toimige järgmiselt.
- Installige MIT App Inventori kaaslase rakendus oma Androidi nutitelefoni.
- Kontrollige, kas teie arvuti ja Androidi nutitelefon asuvad samas WiFi-võrgus.
- Avage rakendus nutitelefonis ja klõpsake oma arvuti ülemisel menüüribal nuppu "Ühenda" ja valige "AI kaaslane".
- Puudutage nutitelefoni rakenduses "skannida QR-koodi" ja skannige arvutis kuvatavat QR-koodi. Teise võimalusena sisestage rakenduse tekstiväljale näidatud 6-kohaline kood ja koputage nuppu "ühendage koodiga".
- Rakendust saab nüüd oma Smarpthone'is proovida.
Testige rakendust emulaatoriga
Kui teil pole nutitelefoni saadaval, siis testige oma rakendust rakenduse leiutisse integreeritud emulaatoril.
- Laadige alla ja installige tarkvara App Inventor.
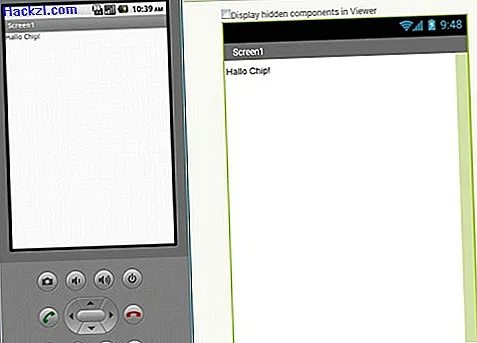
- Nüüd avage installitud rakendus. Teie arvutis avaneb mobiiltelefoni ekraan.
- Nüüd klõpsake avatud projekti all App-Inventori menüüribal nuppu "Ühenda" ja valige seal "Emulaator". Võimalik, et peate nutitelefoniga ühenduse loomiseks koputama nuppu "Lähtesta ühendus".
- Rakendust kuvatakse nüüd emulaatoris.
- Mõnel juhul näete veateadet. Seetõttu pole kaaslase rakendus enam ajakohane. Seejärel klõpsake kuvatavas aknas "OK".
- Kinnitage värskendus emulaatoris nuppudega "OK" ja "Install". Lõpuks klõpsake emulaatori ekraanil "Valmis".
- Ühendage uuesti läbi "Ühenda" -> "Lähtesta ühendus" ja seejärel "Ühenda" -> "Emulaator".
Kui olete oma rakenduse loonud, saate rakenduse .apk-faili oma arvutis menüüribal salvestada menüüribal "Ehitamise" kaudu. Kui olete rakenduse Google Plays avaldanud, peaksite mõtlema ka oma rakenduse turustamisele.